Again, its been a while… But there is a bit of an update:
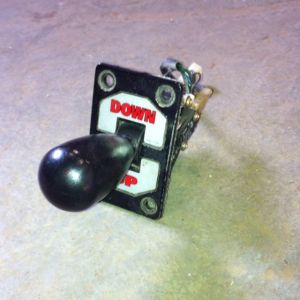
I acquired an Up / Down Shifter from eBay, rather then using Shifter Buttons on the Steeing Wheel I mentioned in the previous post.
An Outrun 2 Shifter (eBay – £30) to be precise;
I fitted the Shifter but I decided to mount the shifter plate behind the control panel, as I thought it would make the CP look a bit cramped if it was on top.
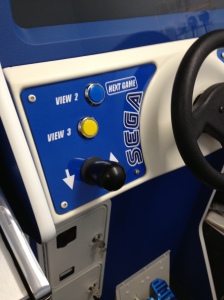
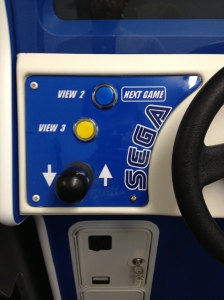
I also added a Sega Logo Graphic to the CP;
As you may have noticed I’ve ditched the View 4 Pushbutton (Does anyone even use it anyway ?? 😕 😀 )
Again I didn’t want to over crowd the CP anymore than it already is;
I have mapped View 4 to the Down Shift switch anyway just in case it is needed 😉
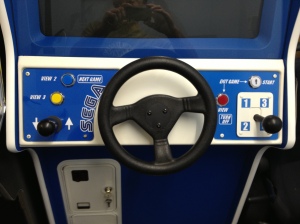
I also mapped the Handbrake in Sega Rally 2 to the Up shift switch.
So all the controls are now mapped one way or another, and Manual gears can be controlled as they should be in all games.
I also added a PC reset switch to the Service Panel as Supermodel does have the odd tendancy to freeze the PC now and again 😦
It’s been nearly a month since I last posted as its taken an age to finish off all the little bits and peices. I think I spent nearly a week tweaking every games Force-Feedback settings to get them as near to Arcade real as possible. Finally though Sega Cab is finished! 😀 😀 😀
On with the show;
– Marquee Mounted inbetween 2 sheets of 4mm Perspex (The HotWire Co. LTD. – £21) and fitted;
– Control Panel Overlays fitted behind 2mm Perspex covers | Shifter, Control Panel & Steering Wheel Emblem painted | New LED Pushbuttons fitted;
– Monitor Bezel cut to Sanwa Monitor shape, painted and fitted;
That was all the Hardware parts of the cab sorted… and in all its glory;
😆 😆 @ How dwarfed little MAME’d cousin is … aww bless!
The next photo’s show the workings of the cab;
< The Lit Pushbutton LEDs & Lit Coin door
…
< The Back-lit Marquee & Sega Start-up Logo
…
< Games Selection Menu
The Sega Model 2 games are Daytona USA, Indy 500, Over Rev, Sega Rally, Sega Touring Car & Super GT 24H. The Sega Model 3 Games are Daytona 2, Scud Race Plus & Sega Rally 2.
…
< Lights Off!
…
Here’s a Video;
…
In total the Project has cost around £350, this isn’t including the PC which I had spare anyway. Considering you will pay this and more for a used dedicated cab with one of these games I don’t think its too bad really. I also sold off the old Cruis’n USA Marquee and Power Supply which got me £30 back. The PC isn’t anything too flash either, the Spec is;
CPU – Intel E8400 Dual Core 3 ghz (Overclocked to 3.46 ghz)
MOBO – Asus P5Q-EM
RAM – 3 gb DDR2 800 mhz
GPU – 1 gb ATI Radeon HD 4670
HDD – 2 x 160 GB Western Digital (1 For Backup)
CPU FAN – Artic Freezer 7
I also have an 80mm Case fan blowing onto to the HDD’s. All the PC component’s temperature’s have been checked using the SpeedFan Program, and work at safe levels at full load.
…
One thing that still is to do at some point is mount 2 small fire pushbuttons I have into the steering wheel as up / down shifter buttons, as 4 out of the 9 games use an up / down shifter instead of a 4-way one. I have the up / down shifter mapped to the View 3 & View 4 pushbuttons at the minute as the games that use this shifter only use 2 View buttons anyway. Automatic gears can be used in these games as well.
I’m getting fairly close to completion now, but one thing I did say to myself when this project started was “…Your going to have days when things go backwards…” and Friday was one of those days.
I got all the components in and wired up and although it looks like Spaghetti Junction in the back, everything worked.
So Friday I wired in an Earth Wire to all the Metal Parts of the Cab and Wired the Pushbutton LEDs in. I fired up the cab, the Pushbuttons light up but when I get to the HyperSpin Frontend Game Menu none of the Controls are working!! … 😦
By the end of the night (well… early morning) and after re-installing Immersion drivers, re-configuring the I-PAC (which now won’t keep the programmed mappings after a reboot!!) and adpating the Start-up script to map the buttons instead, We’re back on course apart from one thing: The Throttle isn’t working! … I’ve narrowed it down to a Hardware issue and investigation work continues tommorow.
The most annoying thing is I have no idea why the problems started but refer to the saying in Paragragh 1 of this post and move on.
Things to do to Complete Project;
– Fit Control Panel Overlays (Awaiting Delivery, Zazzle – £8)
– Cut and Fit Acrylic Control Panel Covers (eBay – £4)
– Paint Shifter Plate
– Adapt, Paint and Fit Monitor Bezel
– Fit Marquee (Awaiting Delivery, EMDKAY (USA) – £20)
– Order, Cut and Fit Acrylic for Marquee
– Clean up and Re-Fit Rubber Matting and Kick-Plate
…
Pictures and Videos to Follow on completion.
…
EDIT – OCT 1st
We are back to full throttle – I checked all connections and they were fine, but one of the cables from the throttle pot lacked continuity so replaced the cable and bingo problem solved. My guess is that the cable had slight wear and when I’ve tied it to the new earth cable it has caused it to break.
I’ve now also backed the cab into its long-term home position (The Game-Room), Since now all the work left to do is on the front of the cab. Luckily it only needed moving about 4 metres and through only 1 doorway, as it’s an absolute beast of a weight with everything in it.
I’ve been away and had a few bits on of late but I’ve made some steady progress all the same.
I’ve adapted the monitor brackets to fit the bigger monitor, its pretty snug but fits … just;
It was also time to get painting …. Sega Blue;
And Spraying;
Put them together with some White T-Molding (T-Molding.com (USA) – £12) and …
Ta-Da!
…
I also made some progress on the software side of things too;
The Sega Model 2 and Model 3 Emulators are setup and running nicely through the HyperSpin frontend, the Steering Controls are all configured and the Force-Feedback is up and running a treat.
…
Next job is to get all the components into the cab and sort out the appearence of the driving controls.
I haven’t had a lot of time on the project this week but the Immerison FFB Power Supply did land, so I made a fair bit of progress on interfacing the Immersion FFB PCB;
Here’s a video of testing some of the FFB effects;
I’ve decided to use the Ipac I received with the monitor to interface the Gears, Pushbuttons, Service Panel & Coin Mech. The reason being that the Immersion PCB inputs require a seperate ground rather than the Ipac which shares a common ground and cuts down on the amount of wiring.
Unfortunately the 24v Power Supply for the Immersion board hasn’t turned up yet (it is coming from Hong Kong though), so its been a week of tarting up the cab cosmetically.
The bottom of the cab was badly water damaged and the MDF had swollen badly around the front edging.
I replaced the bottom and the base board at the back;
Adapted the coin box / service panel unit inside the cab to take a Sub-Woofer in the bottom and fitted a Speaker Grill to the front;
Repaired the area where a door bar had been fitted;
Filled and sanded the entire cab;
Prepared all the metal parts (apart from the controls) ready for painting;
The idea > Convert a non-working drving cab to a Sega Model 2/3 emulated PC Arcade Cabinet.
The notion for this blog has come at a point where my project is already underway. Here’s what has gone before;
I bought a non-working Cruis’n USA upright driving arcade machine (eBay – £50);
After a bit of investigation work I found the Game PCB to be shot as well as the monitor.
The monitor, a Wells Gardner U5000 (which is prone to all kinds of problems) had some serious screen burn anyway.
Another Monitor was the only realistic option. Enter the Sanwa 29E31S; (eBay- £90)
The seller actually gave me a free Ipac as well, which may come in handy depending on how I interface everything.
I stripped out the cab from the unwanted wiring and parts, retaining the driving controls, coin mech/door, service panel, coin meter, marquee light and speakers.
I’ve primarily setup a PC which I had lying about with Sega Model 2 and Sega Model 3 Emulators and connected up the monitor to the PC via VGA cable @ 640 x 480 resolution.
Parts ordered and received but yet to be configured:
So thats roughly where I am with the project so far. The next immediate steps are to interface the driving controls and FFB motor to PC with the Immersion PCB and make a start on the cab cosmetically….

")
")
")
")
")
")
")
")
")
")
")
")
")
")
")
")
")
")
")
")
")


